Resources & Support
Select a product below to view support articles, videos, manuals, and obtain the latest updates.
How to translate a manual into another language
To translate a manual into another language, follow the steps below:
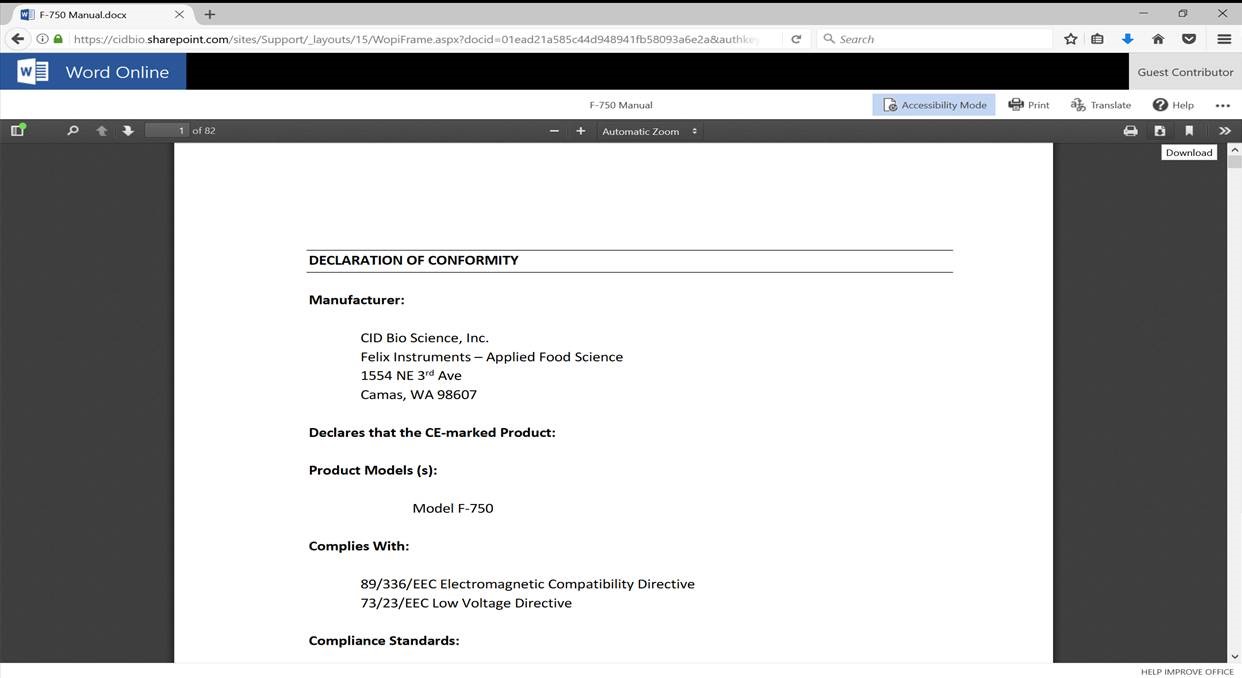
- Once the manual is open, select the contextual menu by selecting the “…” option in the upper-right hand corner of your screen.
- Select the translate option.
- Select your preferred language. Select translate.
Note: Due to limitations of Microsoft Translate, manuals greater than 50 pages in length currently do not support dynamic translation.
Specifications
| Measuring Thickness | 1.5 cm maximum |
| Measuring Width | 15 cm maximum |
| Measuring Length | 36 cm |
| Scanner | 670 nm laser |
| Resolution | 0.01 cm2 |
| Accuracy | ±1% for samples >10 cm² |
| Interface | USB 2.0 |
| Memory Size | 8,000 measurements |
| Dimensions | 38.5L x 29W x 12.5H cm |
| Weight | 1,500 g |
| Display | 16 characters x 2 lines LCD |
| Scanning Speed | 127 mm/second |
| Battery | 7.2 volt rechargeable NiMH |
| Battery Capacity | 200-250 scans per charge |
| Operating Temperature | 0-50 °C |
Get to know the CI-202 Portable Laser Leaf Area Meter
Current Version
| Software | Download | Installation Instructions |
| LibUSB setup tool for CI-202 | Download Zip File | 1. Extract libusb_setup_202.zip 2. Run the installer and follow the prompt. |
| Transfer data from CI-202 to PC | C202dfV1006.exe | |
| Zip file with firmware code, download program and driver | CI-202 Firmware UpdateV308 and Driver.zip |
Previous Version
The software below works with Windows 95 through XP, and is used to download data from the CI-202 (RS-232 version) to a Windows PC.
| Software | Download |
| Allow COM1-COM4 with a default of COM1 | RS232_202V1003.exe |
| Allow COM1-COM7 with a default of COM5 | RS232_202V1004.exe |
-
Where do I download the most current version of CI-202 software?
-
- The latest version of software and the driver can be downloaded at www.cid-inc.com/Software/CI-202.
-
How many measurements is the instrument able to save?
-
- The number of files which the instrument is able to support is limited to 256. The number of records is limited to 8192 which is adequate for any reasonable data collection cycle between recharges. This number gives a good balance between search speed, records and filenames.
-
How are the measurements stored?
-
- All measurements are associated with a file name. The user may create, delete, truncate, or close any file. If the last file has been deleted, the Measurement menu will no longer be available. To allow measurements, just create a new file. All measurements are stored as 16 byte records in a circular buffer in serial flash memory. If record to be stored crosses a page boundary, that page will be automatically erased and then the record will be written to flash. Page size is 256 bytes with current hardware version. This approach gives the user the illusion of infinite storage size, and flash wear out is minimized. This approach also means that the user needs to download important data to a computer before it gets overwritten.
-
How is the threshold computed?
-
- While doing High/Low threshold computation, make sure no object is present during the high threshold computation, and place white paper on either side of scan area while doing low threshold, repeat this procedure a few times and the results should become consistent run to run; if not, repeat the calibrate scan parameters procedure above.
-
Should the user ever calibrate the instrument?
-
- It’s not difficult for anyone to calibrate the scan parameters as long as the guidelines are followed. Here are the basic steps:
- Select Threshold
- Switch to Root Mode
- Switch off the filter
- Run manual scan while observing “W” value
- Set filter value as average “W”-1 and turn filter on
- Run High Threshold and then Run Low Threshold
- Set threshold as average high/low in manual scan mode
- Compute Timing parameters (done by instrument)
- Get back to Measure menu make sure no objects in scan area
- Press “Left” and “Right” keys at the same time and wait for a few seconds for the instrument to stop
- Save parameters
- Go to Adjust Scan menu ( press in same time “Save” “Stop” key in Setup->Scanner menu
- Navigate to Scan Time menu, press “Stop” key twice and press “Save” when asked
- Cycle the power
- The above steps should be successful if the optical block has been properly adjusted.
-
What are the filters for?
-
The filter will discard any objects that are less than the specified filter size. A filter value of 100 corresponds to an object approximately 1mm across. If the scan area has defects that generate a lot of small objects or the user is sure that the object to be measured is large enough, then the filter should be switched on; this will filter out any noise which may come during a scan. In root mode, the filter will clear the corresponding number of transitions in the digital signal; this is useful during the threshold computation. Otherwise, if the object is small (like a pine needle) then the filter value should be reduced or it could be completely switched off from Setup->Scanner->Filter menu. Always press the Save key when scan parameters are changed.
-
How do you measure root length?
-
- Stay in Leaf mode, turn off the filter from Setup->Scanner menu and make a regular measurement. Use the perimeter value divided by 2 as the Root length value, this estimation is good if the width of the roots is negligible; if not, the user should use area in final computation.
-
How often should the battery be recharged?
-
- When the battery is charged 100%, the unit should last up to 200-250 measurements. To save power, the instrument will be turned off automatically after 5 minutes of inactivity.
-
How do you recharge the battery?
-
- The instrument has an internal rechargeable NiMH battery rated 7.2V at 2200mA/H. It could be charge either from the plugin wall charger or a computer USB port. In either way charge process could be monitored from View->Battery menu. If the wall charger is used an internal circuit will control charging, no inputs are require from user and faster charging occurs if the unit is turned off. If the unit is connected to a computer USB port, the unit should be turned on to make use of the full charging current available. The fastest charging occurs when connected to the USB port while the unit is turned on. The instrument will automatically turn off the high power charging when the battery is fully charged. The user may also manually control charging by switching it on/off in View->Battery menu, but trickle charge will continue even if the user switches charging off. Be aware the instrument should be connected to a normal high power USB port which is able to provide up to 0.5A. Some hubs that have other peripherals plugged in may not be able to provide the normal 0.5A.
-
What is the resolution?
-
- The CI-202 with filter turned off is able to reliably detect objects up to 0.2mm across. Be aware the CI-202 does not process pixels, all measurements are done based on scan times to the edges of the physical object. Vertical resolution is about 0.25mm.
-
How many modes does the instrument have?
-
- The instrument has 2 modes, one is called Leaf mode and the other is called Root mode. All measurements, even a root length measurement, are recommended to be done in Leaf mode. The Root mode will measure root length using older techniques for historical reasons, but it is mainly used today in the calibration process. To switch modes the user has to navigate to Setup->Measure menu and press Enter. To make selected mode persistent across power cycles user should press Save key.
-
How do I clean the CI-202?
-
- Make sure the scan window on the scan head is clean. Do not use paper products to clean any optical parts of our devices. You must always use a clean soft cloth with a little moisture to prevent scratching of components such as mirrors, scan windows, and cover sheets on the CI-202 scan board or lenses. Paper products can act as sandpaper on optical parts and ruin the device. Dirty optics and components can make the length measurement unstable. On the bottom of the scan head you will see a small optic sensor make sure it is clean also. It runs down the guide rail of the scan board. You may also want to clean the rail as well. Its coating is critical to the functioning of the device as well.
-
How do I update the firmware on a CI-202?
-
Please refer to the CI-202 Firmware Update Procedure document.
-
How do I download the manual as a pdf document from the website?
-
- Open up the desired manual in a browser window
- Click ‘Accessibility Mode’
- Select the download icon. The manual will download as a pdf.

-
How do I replace the battery in my instrument?
-
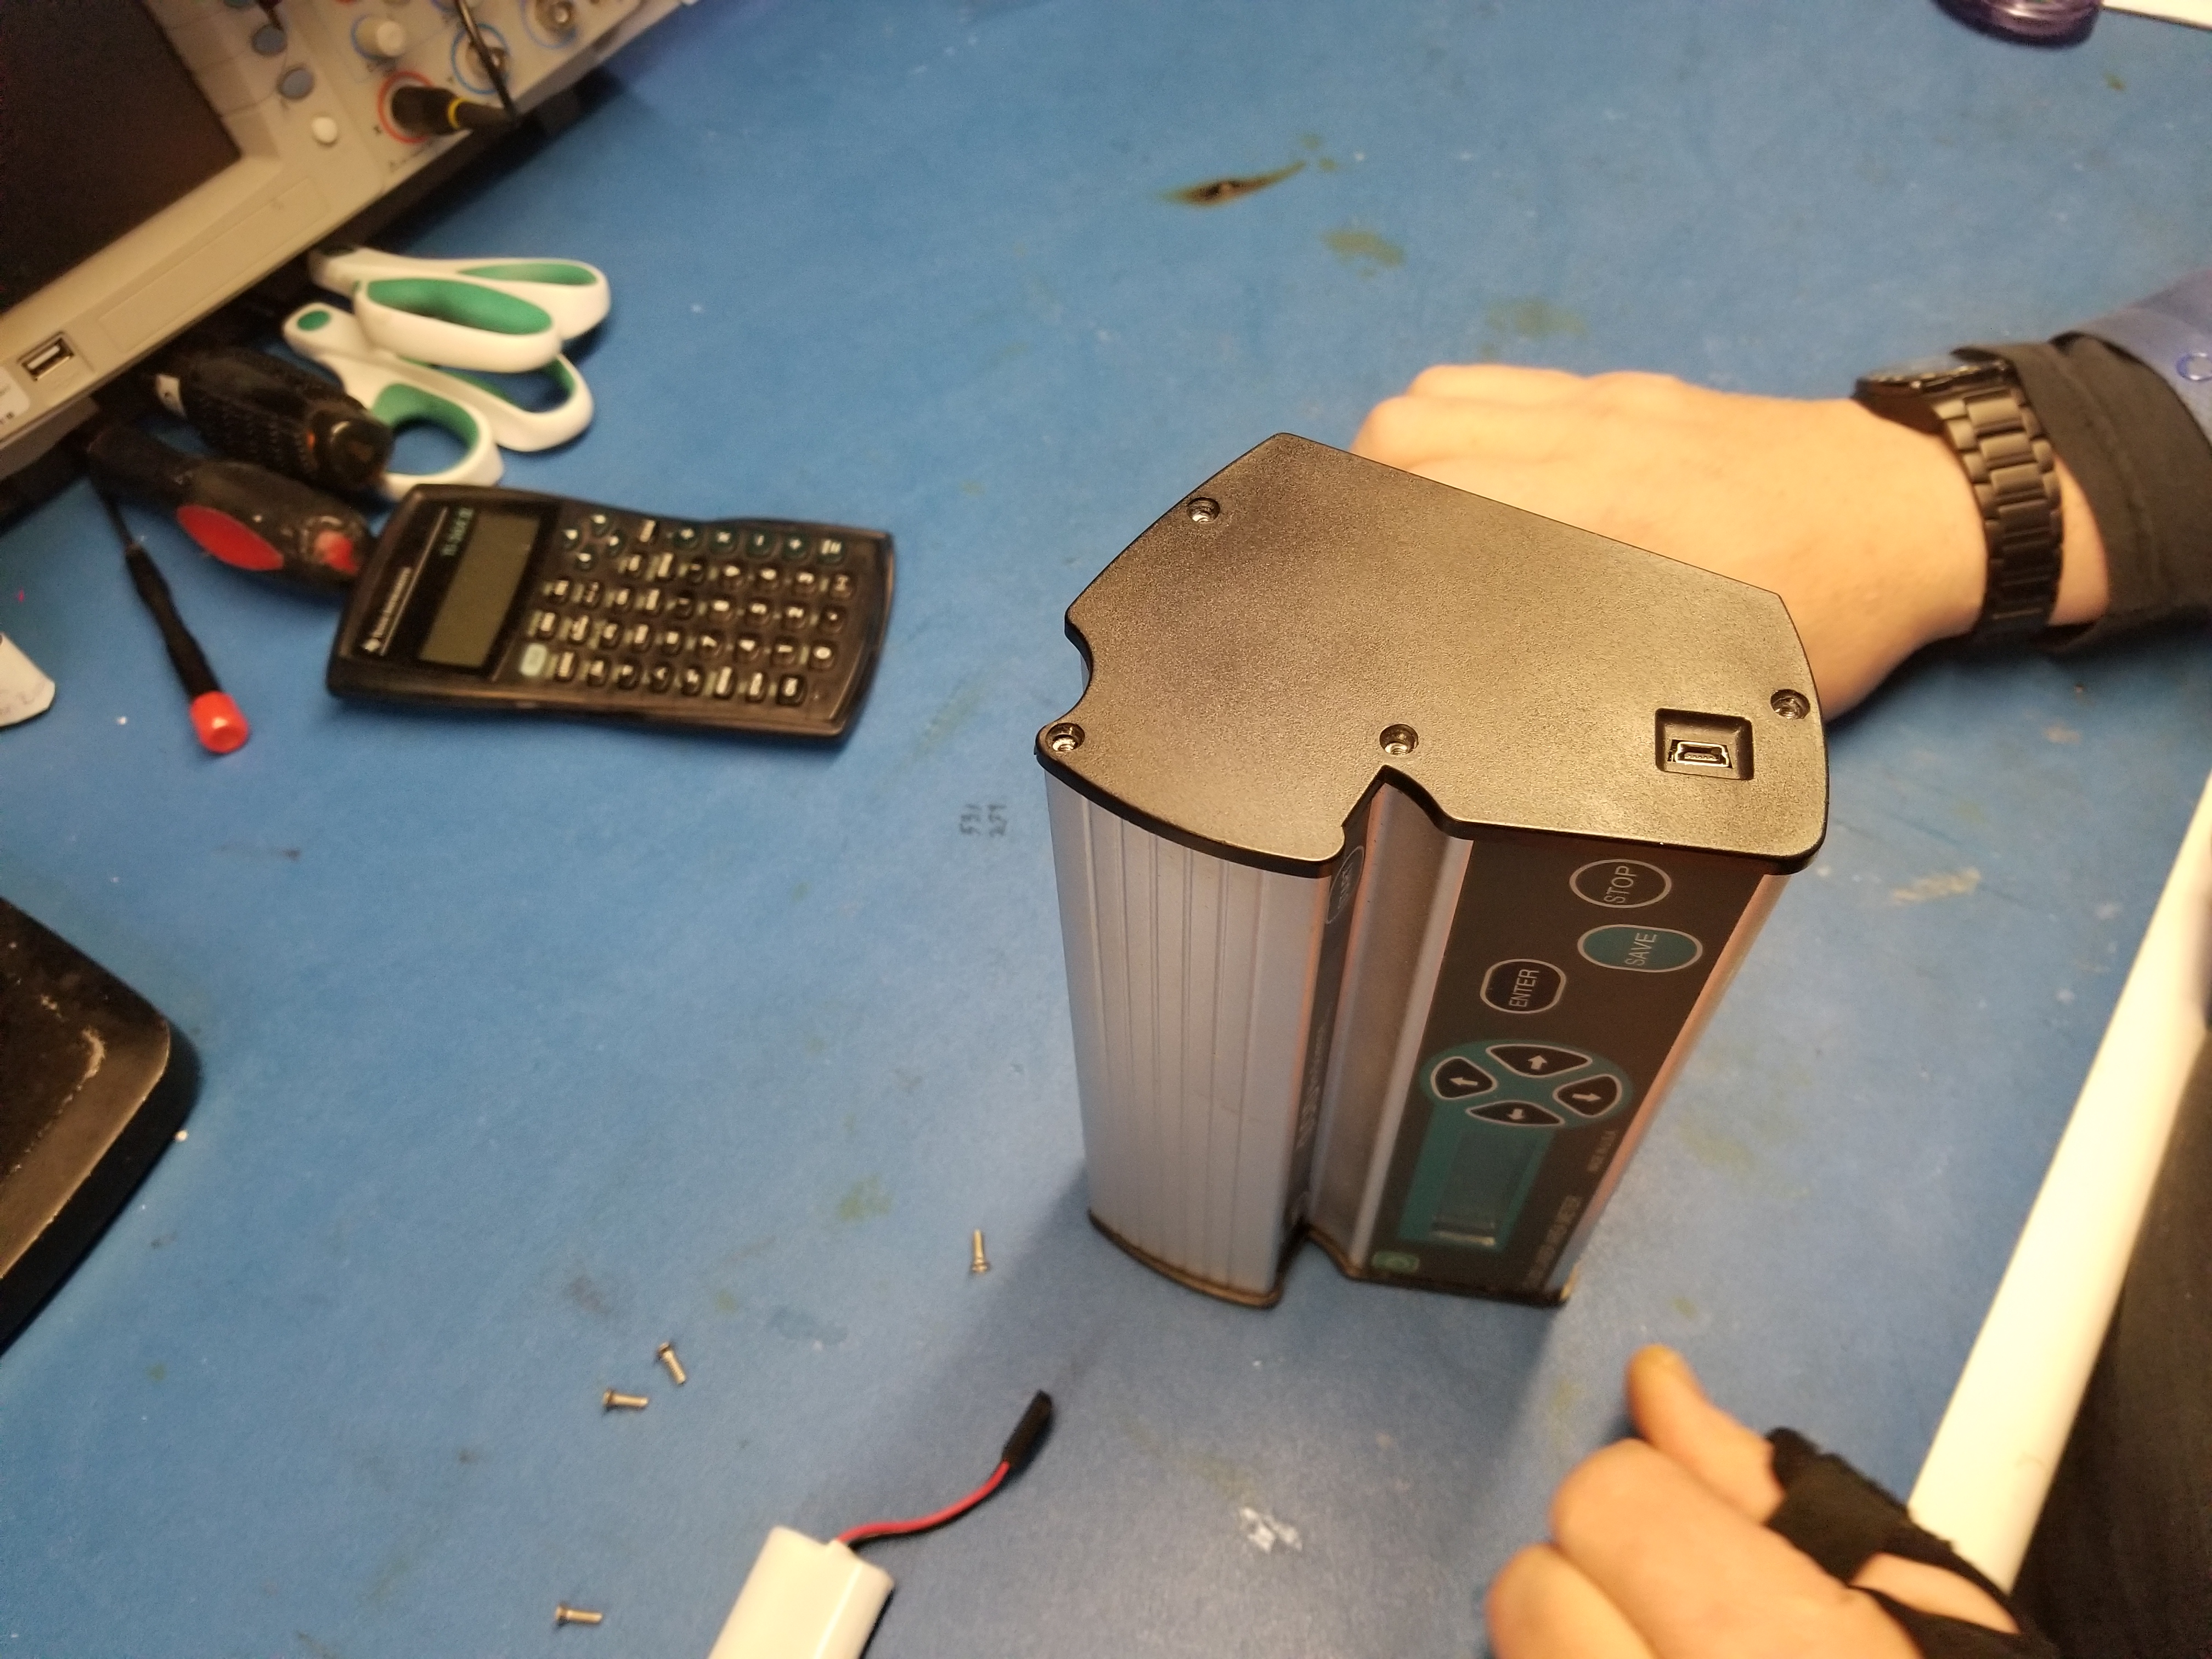
To replace the battery in your CI-202, begin by removing the screws holding the cover featuring the mini-USB port in place. If you’re unsure which end of the device this is, it is the end used to charge the instrument as shown below.

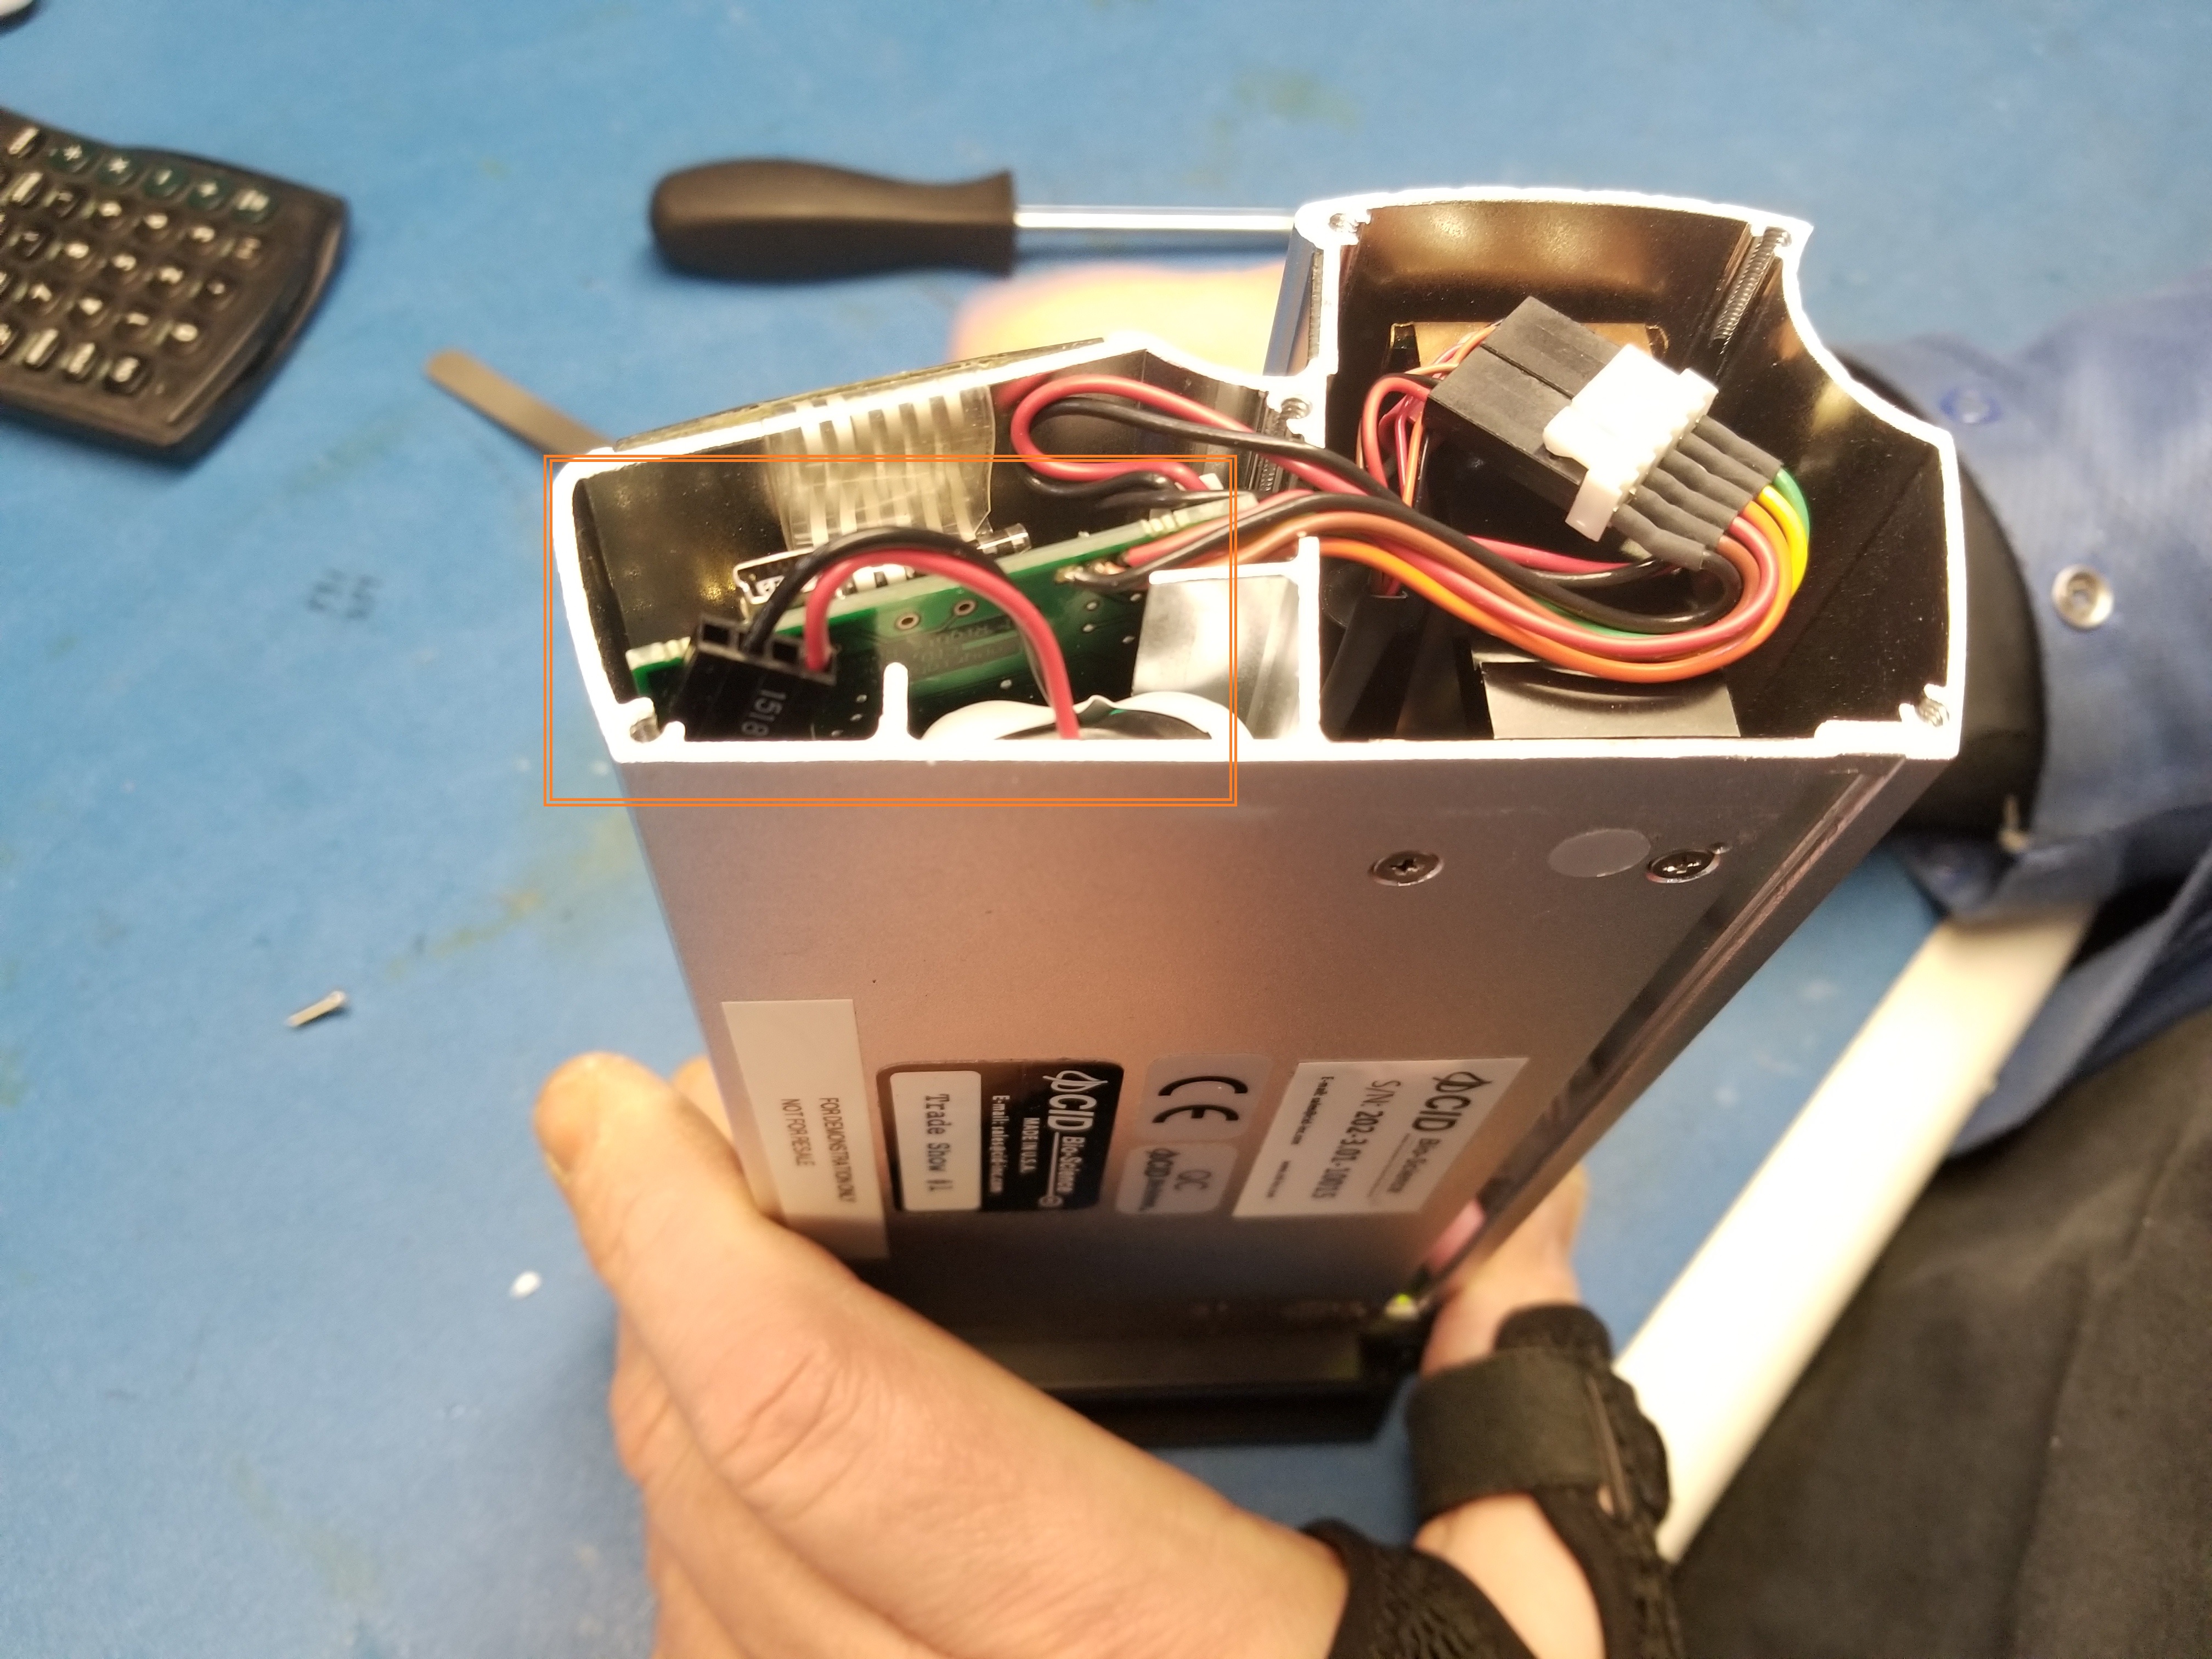
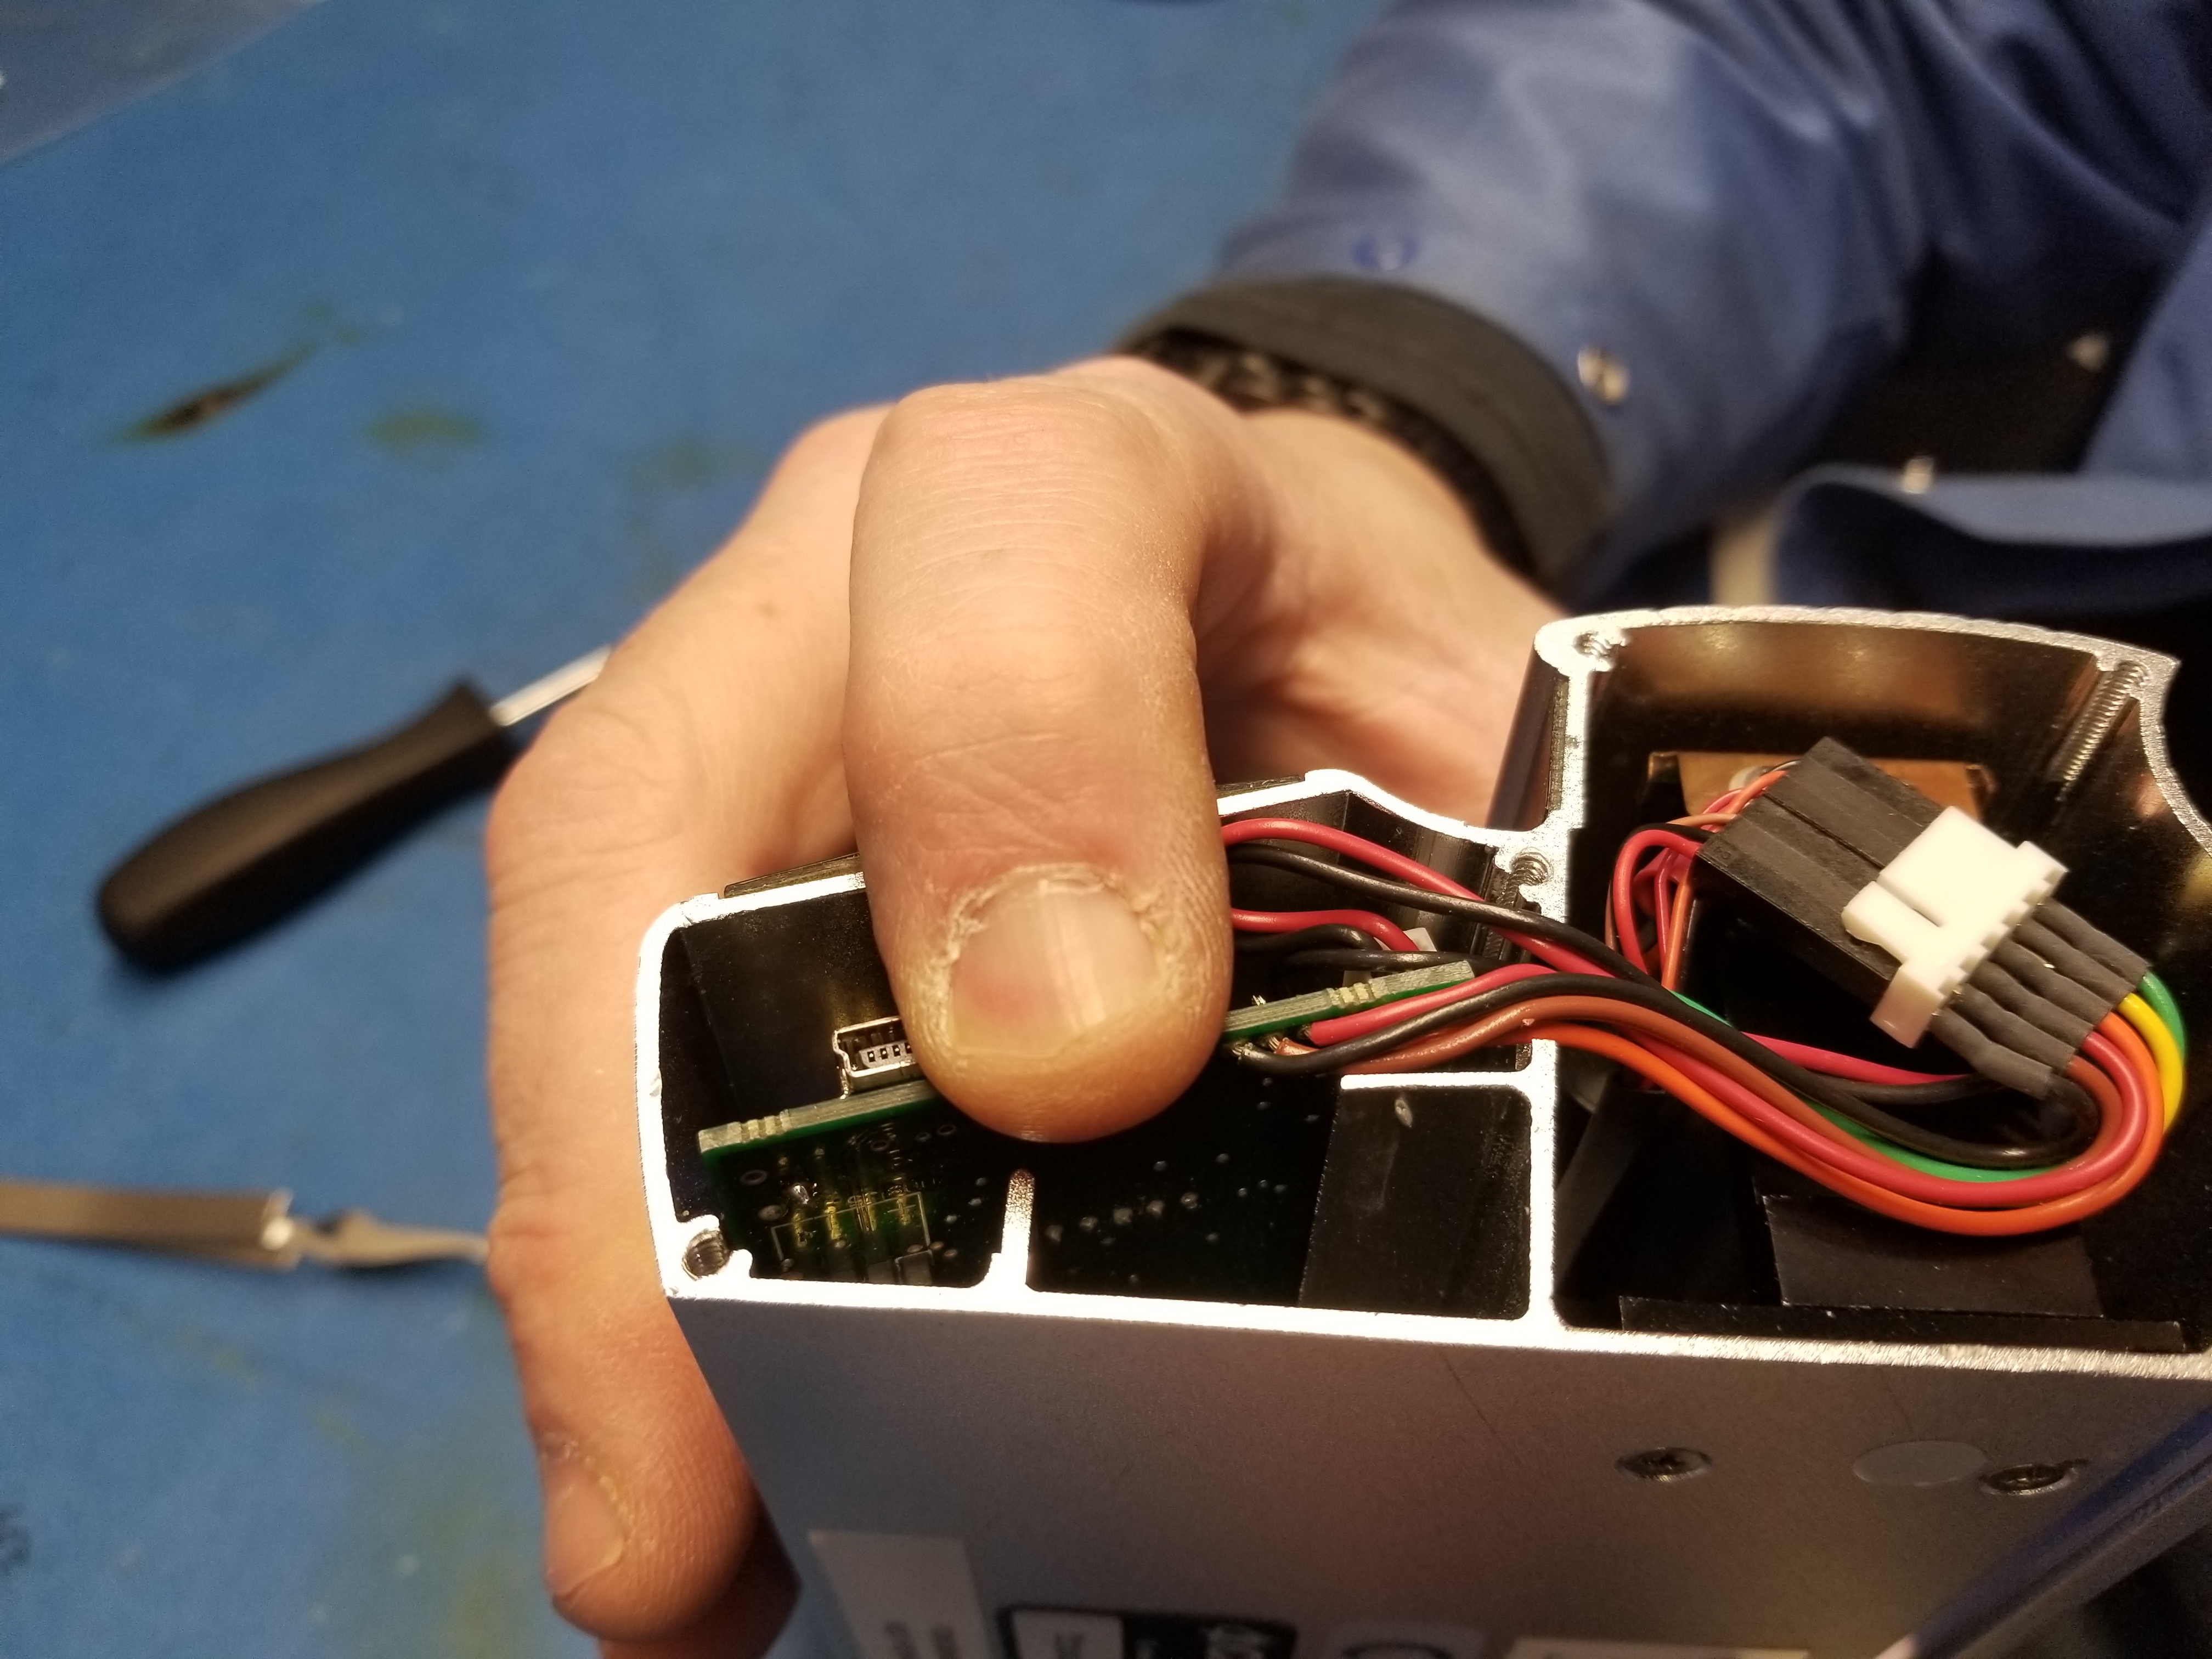
Once the cap has been removed, we must first disconnect the battery from the device before removing it. Just below the mini-USB port there is a 4-pin adapter with a black wire and red wire connected to the existing battery (as shown below). Unplug the adapter by pulling it directly out.

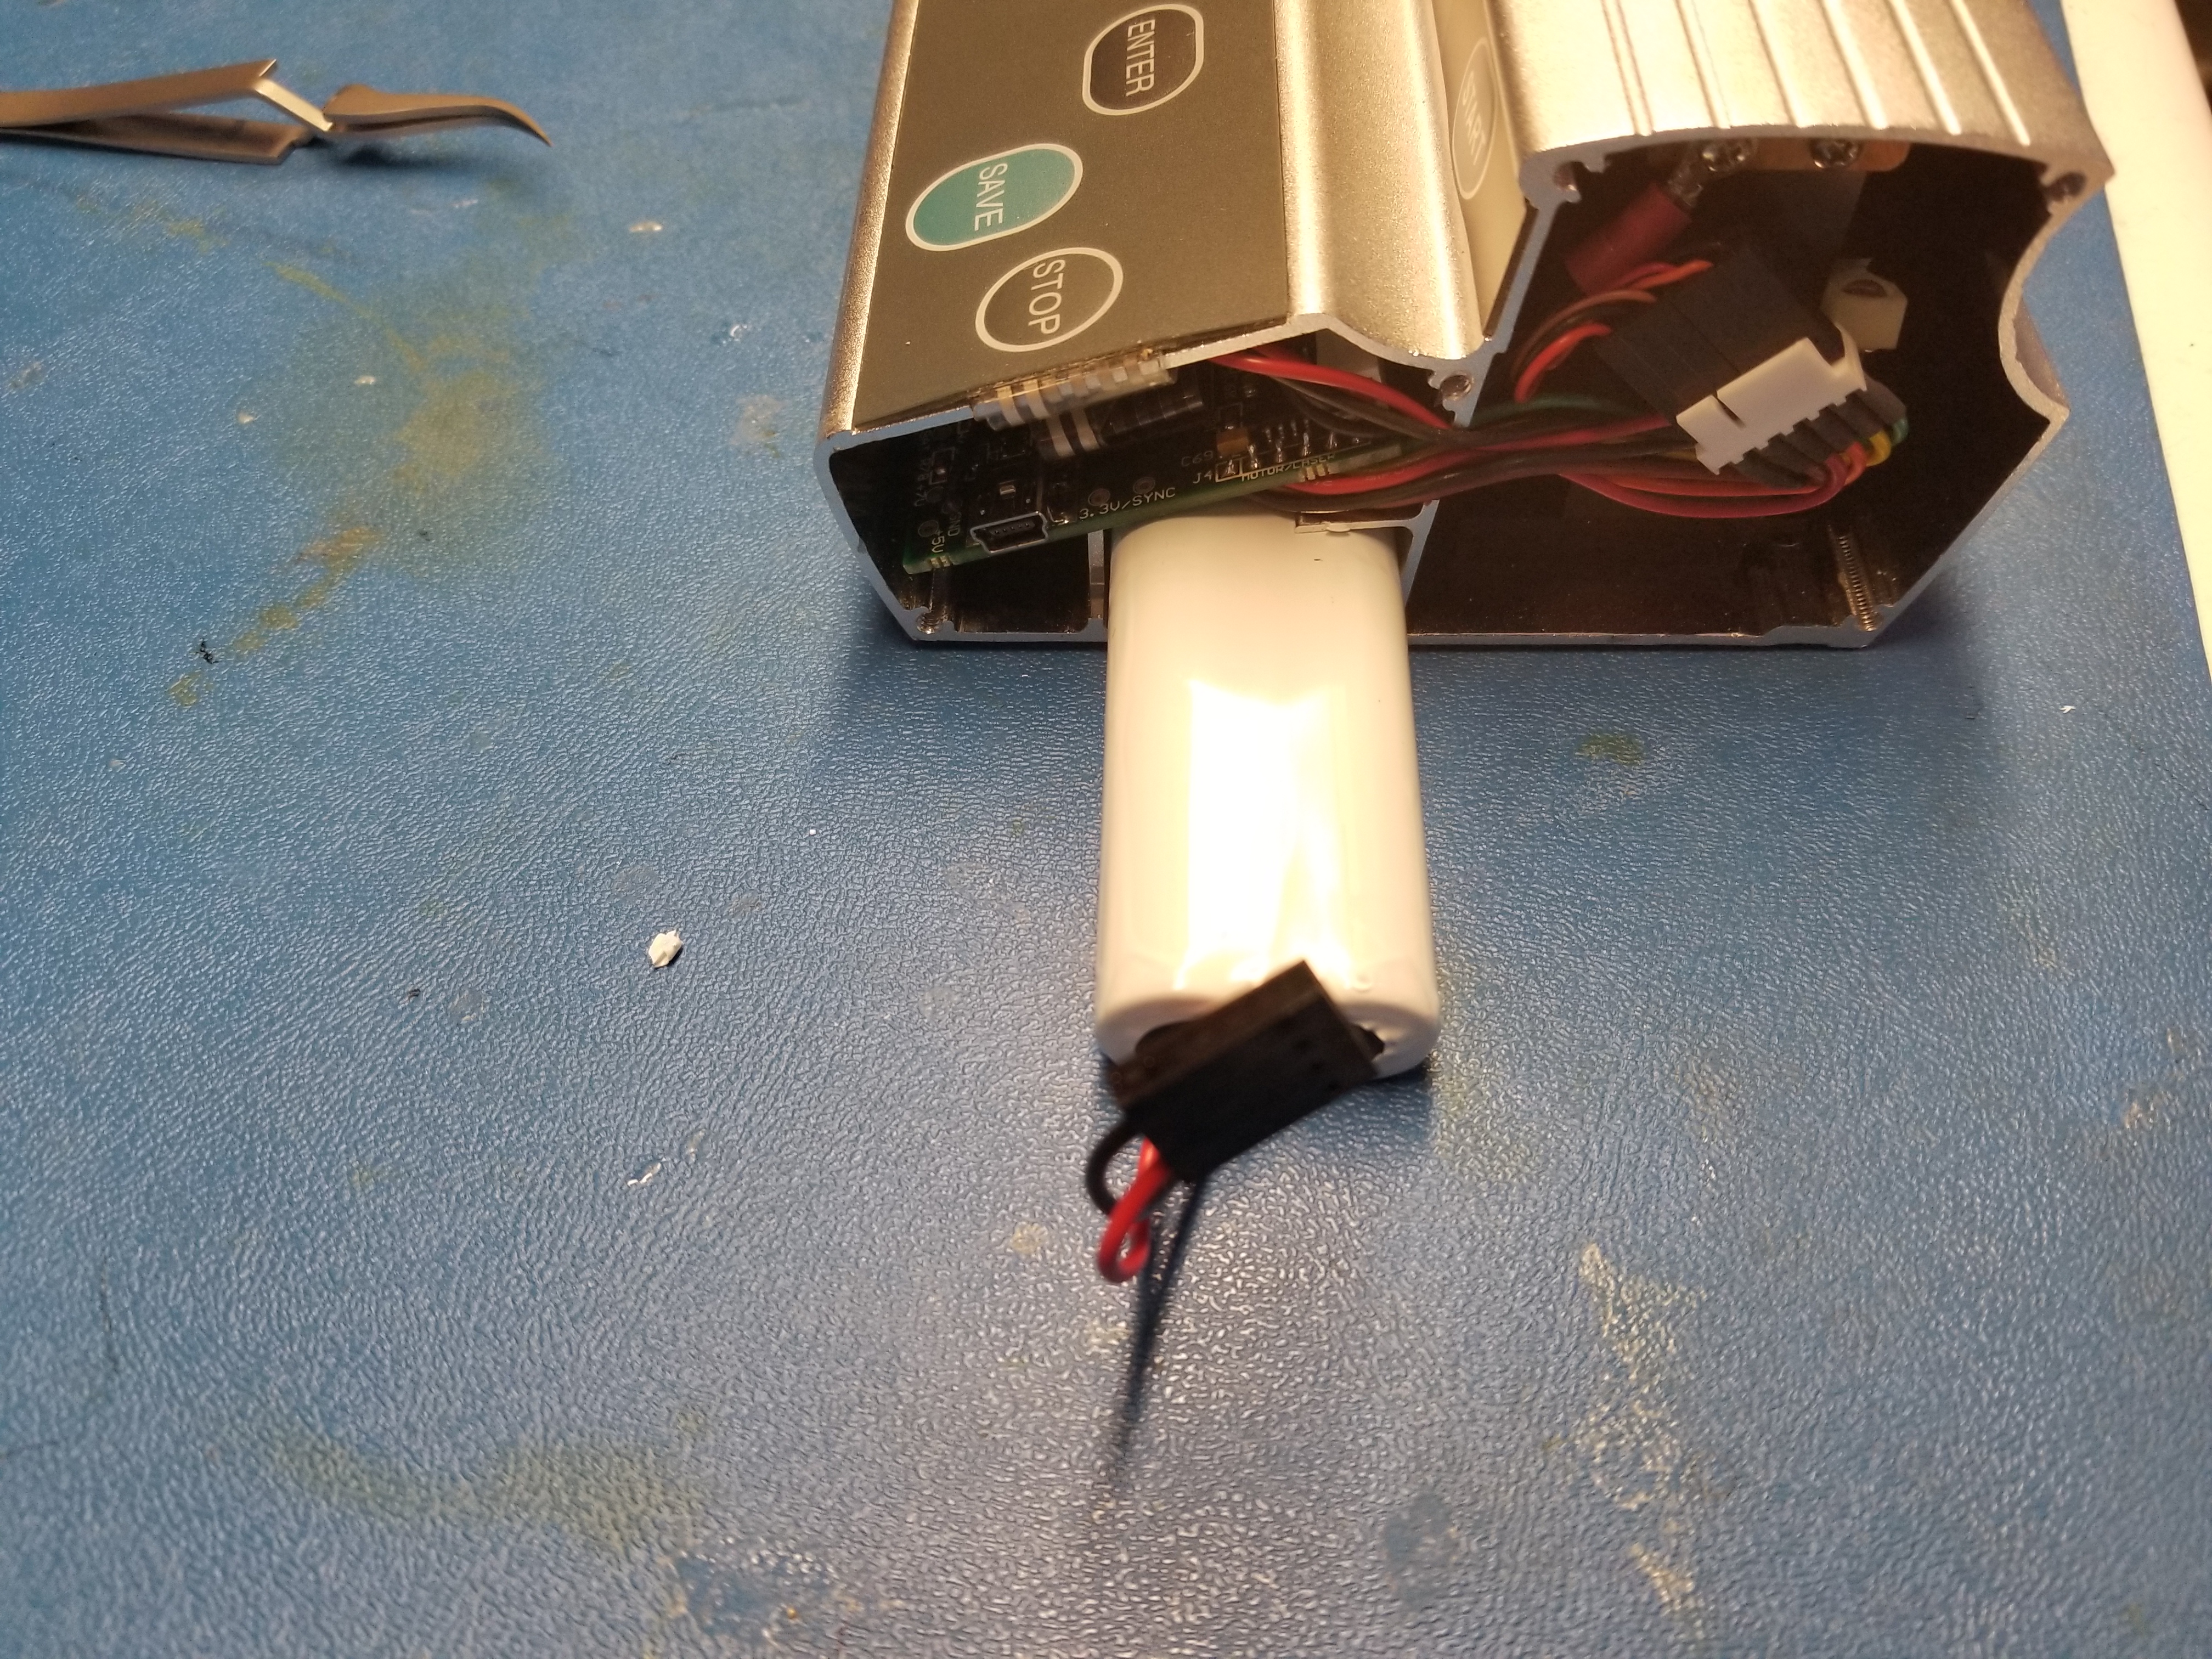
Once the battery has been disconnected from the device, it can be removed from its receptacle in the instrument housing, shown below.

Once you have removed the existing battery, the replacement can be slid back into the housing. If you encounter any resistance or difficulty when inserting the replacement battery, gently lift up on the board to allow for any additional room required, as shown below.

Once the battery has been replaced, you may begin reattaching the adapter from the battery to the instrument. It is important to ensure that the red ‘positive’ cable rests on the right, closest to the battery, while the black cable remains on the left, as shown below.
Once the battery has been reattached, the cover can be replaced. Be sure to align the mini-USB port with it’s cooresponding opening in the cover. Screw in the assembly screws and power on the device to ensure a succesful replacement.
-
How do I adjust my laser alignment?
-
As of the latest release of the CI-202, users may adjust laser alignment themselves. To perform this adjustment you will need:
- 0.035 inch allen wrench for stopper screw
- 5/64 inch allen wrench for the adjustment screw
Once ready, you can follow the instructional video provided here to adjust your CI-202 laser alignment.
-
How does the Portable Laser Leaf Area Meter work?
-
- The CI-202 is a laser scanner. While over the scan area, the laser light is reflected back to a photodiode which measures the light intensity. The light intensity is compared with the threshold voltage to generate a digital output that is ready to be processed by the micro controller unit.
-
Does this product come with a warranty?
-
All CID instruments come with a 12-month warranty from the point of sale. The warranty covers repairing and replacing defective parts of the instrument that were manufactured directly by CID Bio-Science. The warranty does not cover wear and tear, neglect, misuse, accident, or excessive deterioration. Further, repair and alteration by an unauthorized party voids the warranty. More information can be found in the operation manual of your instrument.
-
Is the CI-202 waterproof?
-
The CI-202 is not designed to be waterproof and should not be used underwater. The CI-202 is designed to be water-resistant. Use in light rain is fine, however, there are electronics that can be damaged from water entering the instrument, so it is not recommended to use the CI-202 during heavy rainfall.
-
What are the acceptable operating temperatures of this product?
-
The CI-202 can be reliably operated in temperatures from 0 to 50° C. For temperatures outside this range, please consult with our application science team.
-
What different types of researchers use the Portable Laser Leaf Area Meter?
-
Plant physiology, forestry, environmental, and crop researchers all benefit enormously from the metrics that the Portable Laser Leaf Area Meter provides.
