Resources & Support
Select a product below to view support articles, videos, manuals, and obtain the latest updates.
How to translate a manual into another language
To translate a manual into another language, follow the steps below:
- Once the manual is open, select the contextual menu by selecting the “…” option in the upper-right hand corner of your screen.
- Select the translate option.
- Select your preferred language. Select translate.
Note: Due to limitations of Microsoft Translate, manuals greater than 50 pages in length currently do not support dynamic translation.
Specifications
| Lens | Self-leveling hemispherical lens |
| Image Resolution | 8 megapixels |
| Interface | USB and Wifi |
| Measuring Time | < 1 second |
| Fish-eye Lens Angle | 150° |
| Operating Temperature | 5 to 50° C |
| Camera Sensor | 5 cm x 5 cm |
| Total Length | 84 cm |
| Imaging Probe and Arm Weight | 1.5 kg |
| PAR (Range / Accuracy) | 0-2500 umol m2s / 5 umol m2s |
Get to know the CI-110 Plant Canopy Imager
Canopy Analysis in Agriculture: Outdoor and Greenhouse Applications
Plant Canopy Imager Live Training | CID Bio-Science
Canopy Imaging & Analysis Webinar: Made in the Shade - How 11 Research Studies Use Canopy Analysis
Cacao Undercover: Optimizing Cacao Orchard Systems using the CI-110 Plant Canopy Imager
CI 110 Plant Canopy Imager Live Demon Thursday, July 5, 2018 7 03 43 PM
Current Version
CI-110 (Embedded Display) Downloads
The latest CI-110 software (v1.1.71) can be downloaded from here.

CI-110 Legacy (Stand-alone Display) Downloads
32-bit
| Information | Downloads |
|---|---|
|
Serial: 110-2.13-xxxxx or higher |
v6 software |
|
Serial: 110-2.13-xxxxx or higher |
v5 software v6 driver 32-bit phidget |
|
Serial: 110-2.09-xxxxx |
v5 software v5 driver 32-bit phidget |
|
Serial: 110-2.08-10021 –> 110-2.08-10046 |
Download v4.0.8 |
|
Serial: 110-2.08-08057 –> 110-2.08-10015 |
Download v3.2.0 |
|
Serial: 110-2.06-05020 –> 110-2.07-08007 |
Download v3.1.0.7 |
|
Serial: 110-1.03-98240 –> 110-2.05-05008 |
Download v3.0.3.2 |
64-bit
| Information | Downloads |
|---|---|
|
Serial: 110-2.13-xxxxx or higher |
v6 software |
|
Serial: 110-2.10-xxxxx –> 110-2.12-xxxxx |
N/A |
|
Serial: 110-2.09-xxxxx |
N/A |
|
Serial: 110-2.08-10021 –> 110-2.08-10046 |
N/A |
|
Serial: 110-2.08-08057 –> 110-2.08-10015 |
N/A |
|
Serial: 110-2.06-05020 –> 110-2.07-08007 |
N/A |
|
Serial: 110-1.03-98240 –> 110-2.05-05008 |
N/A |
*Note: In order to install the CI-110 driver in Windows 8 & 10, you must disable the driver signature enforcement (click here)
**The current and legacy software and devices are not compatible.
-
How do I analyze images on a different computer?
-
- The key is that there are several files required to load a record. You have to move all those files to migrate data between systems. You should copy the entire “Output Folder” contents to the new system using an SD Card, USB drive, WiFi, etc. or use something like Microsoft’s SyncToy to keep the folders on the tablet and PC automatically in sync.
-
The image seems to be centered incorrectly. How do I center the image?
-
- Go to the Advanced Settings tab and change the Top and Left offsets to the values in the Product Test Check Sheet page of this manual.
-
The handle on the stick get warm, is this normal?
-
- Yes, this is normal. The power to run the PAR sensors and camera run through the handle of the stick. This generates the heat in the handle.
-
Which side is up on the stick and camera?
-
- The bottom of the camera mount has a cable attached to it and the stick has opaque white plastic on the top.
-
Where are the PAR sensors located?
-
- The PAR sensors are located in the stick the camera connects to.
-
Why is the image so dark?
-
- The CI-110 camera was modified to use a blue lens, the contrast and other parameters have been adjusted for optimum accuracy. Indoor lights aren’t usually strong enough to show anything other than a dark or black image.
-
How can I load existing images on my computer?
-
- Browse to the image you want to use, then drag-and-drop your image on the Measurement screen.
-
Which Gap Fraction Method should I use?
-
For more information on Gap Fraction Methods please refer to the article by Juarez et al. “An improved estimate of leaf area index based on the histogram analysis of hemispherical photographs.”
-
How do I calibrate the tablet touch screen?
-
- To calibrate the Sol Tab tablet daylight visible touch screen:
- Go to “Start” and “Control Panel”.
- Go to “Hardware and Sound”.
- Under “Tablet PC Settings,” choose “Calibrate the screen for pen or touch input”.
- Click the “calibrate” button.
- Follow the instructions to touch the screen and choose to save the calibration data.
-
How do I access the CI-110 log file if an error occurs?
-
- To access the Log Files:
- Start the CI-110 software.
- Press Control+Escape at the same time or Cnt + Alt + Delete (this launches the Task Manager). Or, right-click or click and hold on the the task bar (the bar that has the system try/notification area and the start menu button at the bottom of the screen). Select “Start Task Manager” from the list.
- From the Task Manager, click on the Processes tab.
- Right click on CID.CI110.exe and select Open File Location (this launches the file browser)
- You should see several ApplicationLog and ErrorLog files.
-
Why do images appear darker with the new software version?
-
- Software version 5.3.1 includes a fix to a bug that prevented the software from properly controlling the camera exposure. Images taken with previous versions of software may appear darker when opened in version 5.3.1. After properly adjusting the exposure, the image should appear correctly.
-
Can I use the CI-110 to study the canopy of grapes?
-
- Unfortunately, due to their irregular canopy shape, the gap fraction method for calculating the Light Area Index of canopies of grapes grown on vertical trellises cannot be accurately measured. So neither instrument can be recommended for the study of grape canopies.
-
What is the accuracy of the CI-110 GPS?
-
- Position: 5m CEP without SA
- Velocity: 0.1m/sec, without SA
- Time: +/- 50ns synchronized to GPS time
- CEP is Circular Error Probability. CEP is defined as the radius of a circle centered on the true value that contains 50% of the actual GPS measurements. So a receiver with 1 meter CEP accuracy will be within one meter of the true measurement 50% of the time. The other 50% of the time the measurement will be in error by more than one meter.
-
Why won’t the GPS lock or find a location?
-
- The GPS can take up to 15 minutes to locate satellites and establish longitude, latitude and altitude parameters. This time should be shorter after the initial connection. The GPS typically needs to be outdoors to connect to satellites.
-
Where do I find a CI-110 64 bit driver?
-
- The CI-110 driver compatibility is hardware specific. Please check your serial number to determine if your hardware is compatible with 64 bit systems.
- Serial numbers with the middle three digits of 2.13 or higher are compatible with 64 bit systems and CI-110 software version 6.
- Serial numbers with the middle three digits of 2.12 or lower are compatible only with 32 bit systems and CI-110 software version 5.3.
-
Where do I download the most current version of CI-110 software?
-
- The latest version of software and the driver can be downloaded at the Software page.
- Click the “Install” button to start the download. If prompted that the publisher is not verified, click Run or Install to continue the setup.
- Next, install the driver according to the Instruction Manual.
- Make sure to completely erase the old version of software and the driver before downloading the new version. To do this, go to Add or Remove Programs in your computer’s Control Panel. Uninstall the “Plant Canopy Analysis System” software and the CI-110 driver (USB TV Device Driver).
-
What should I do if my CI-110 is not recognized by the tablet computer?
-
What should I do if my CI-110 is not recognized by the tablet computer?
1. Open the CI-110 software and go to the “Advanced” tab. Install the driver.
2. If the tablet is Windows 8, make sure that the driver signature verification is disabled. Due to certificate expiration, it may be necessary to disable the driver signature verification after a recent Windows update.
3. Install the driver and verify CI-110 is recognized in the Device Manager.
-
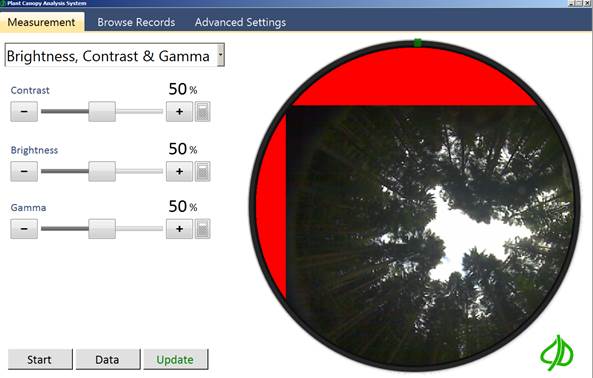
What software adjustments are necessary before saving a plant canopy image?
-
In the CI-110 Plant Canopy Analysis software, it is important to check out the exposure of the camera before saving a canopy image. The exposure of the camera should allow you to clearly see the canopy and sky gaps, without being too bright or too dark. If the image is out of focus, twist the lens of the camera to make it crisp and clear. Finally, verify that the “color control” of the picture is showing a realistic representation of the canopy. Then, capture the image and make sure to hold the camera steady for 1-2 seconds while the image is saved. All other adjustments or edits in the software can be made to the saved image.
-
How do I activate my Office 365 subscription on my Acer tablet?
-
If your Acer computer came with a 1 year Office 365 subscription, you will have 6 months to activate it with Microsoft.
Use the following steps to activate your Office 365 subscription. Before you begin make sure your computer has internet access.
- From the Start Screen, locate and click on the Office tile.
- Click Activateafter Office 365 is verified on your system.
- Enter you Microsoft Account when prompted.
- Verify your Country and Language, then click Continue.
- Click Installfrom the MyAccount page.
- After Office installs, click Nextto continue.
- Click Next.
- Select your Office background, then click Next.
- Click Take a lookor No, thanks.
- Click All done!You will now see Office applications in the Apps List and they can be pinned to Start.
If you have to reinstall Office, login to your MyAccount page, and then click Deactivate Install. After deactivating that installation, click Install. This will install your existing subscription of Office 365.
-
How do I allow all users access to the installed software when using a roaming profile (IT Personnel)?
-
As noted by https://support.microsoft.com/en-us/kb/2571899 clickonce deployment is not compatible with roaming profiles. (roaming profiles are often used in universities where it is nice to have application data follow you from PC to PC)
When installing the software it is useful to create a shortcut from the “.application” file in the installation folder to a location available to all users; such as /user/public or /users/default
-
How do I download the manual as a pdf document from the website?
-
- Open up the desired manual in a browser window
- Click ‘Accessibility Mode’
- Select the download icon. The manual will download as a pdf.

-
Why does my CI-110 crop my image when ‘pause’ is used?
-

This above issue occurs when the Plant Canopy Analysis software is opened on Windows device with font scaling set to greater than 125%. To fix this, navigate too:
Control Panel > Appearance and Personalization > Display > Change the Size of All Items > 100%
-
Where can I find the user manual for legacy CI-110?
-
The user-manual for legacy CI-110 devices (11024P-XXX-XXXXX) can be found here.
-
How does adjusting brightness affect LAI?
-
The effect of adjusting the brightness depends on whether it is done during image acquisition or afterwards, during image processing. If you have already taken the image and are now processing it afterwards, the following relationship is expected: LAI will decrease with increasing brightness.
This is because plant elements, such as back-lit leaves or light green leaves, will be washed-out in the photo and will appear as sky to the software. Increased brightness= more sky = decreased LAI. To counter-act this, re-assign “Foliage” and “Sky” colors in the Sky and Leaf Filter option after setting the desired brightness.
It is recommended to:
- Adjust the brightness so the image appears properly exposed.
- Go to the Threshold menu and choose a method.
- Adjust the slider until all the plant elements appear green.
- Press the Data button.
- Go back and adjust the brightness/contrast until all the plant elements are green.
- Keep tweaking the settings until you have grouped all the plant elements together and separated the sky or background.
-
What improvements were made with the latest product redesign?
-
Providing users with accurate measurements in an easy-to-use form factor are our primary goals. To achieve this objective, the Plant Canopy Imager went through a complete overhaul in 2018. Major improvements included the addition of an on-board touchscreen for easy measurement visualization and the combination of all device parts into one, easily hand-held device.
-
Is the CI-110 waterproof?
-
The CI-110 is not designed to be waterproof and should not be used underwater. The CI-110 is designed to be water-resistant. Use in light rain is fine, however, there are electronics inside of the CI-110 that can be damaged from water entering the instrument, so it is not recommended to use the CI-110 during heavy rainfall. Furthermore, it should be noted that the tablet provided with the CI-110 is not waterproof and a waterproof case would need to be purchased for use in wet conditions.
-
What different types of researchers use the CI-110?
-
Crop, forestry, environmental, plant, climate, hydrology, soil, and weed researchers all benefit enormously from the metrics that the Plant Canopy Imager provide.
-
What crops and broader foliage can I use the CI-110 to study?
-
The CI-110 has been used to effectively measure the leaf area index of forests, pastureland, grasslands, savanna, jungle and virtually any agricultural crop.
-
What types of canopies can the CI-110 be used for?
-
For types of canopies that work well with the CI-110, please refer to the list of published research (http://cid-inc.com/ci-110-publications). The CI-110 has been used to effectively measure the LAI of forests, rice, pastureland, sub-Mediterranean grasslands, winter wheat, Quercus species, Shpaeralcea and Shepherdia species, Amaranthus powellii, Erythroxylum coca, Olea europaea, and Cypripedium flavum, among others.
-
How do I tell when the CI-110 is facing north?
-
- The instrument is pointed north when the tick or arrow-tip on the outside of the image is at the 12-oclock position of the image.
-
How do I focus the image?
-
Press and hold the trigger, and physically rotate the lens at the end of the instrument to focus.